Exploration Quest
Exploration Quest
PvEThe game's permanent PvE campaign — a wave-based, auto-battle stage clearer accessed by tapping the green truck parked outside your base wall. Unlocks essentially Day 1 and continues indefinitely; community clears exist well past level 200.
Core Mechanics
| Property | How It Works |
|---|---|
| Entry point | Tap the green campaign truck parked outside your base wall |
| Format | Sequential stages, each with multiple combat waves ending in a boss wave |
| Squad | Your standard 5-hero squad — no separate exploration-specific team |
| Cost per attempt | Free. No stamina, energy, or resources consumed. Retry as often as you like |
| Outcome | Win or lose only — no star rating |
| Backtracking | Not possible. Once a stage clears you advance and can't replay it for repeat rewards |
| Daily cap | None. Push as many stages as your squad can handle |
Because stages only move forward with no repeat-farming value, the right approach is to push as far as your current combat power allows, then stop until you're stronger — not a grinding activity.
Rewards & Milestone Chests
Each cleared stage gives hero shards (one of the most reliable F2P shard sources in the game), resources, hero EXP, and speed-ups — scaling upward with stage difficulty. The real target is the milestone chest awarded every 5 cleared stages, substantially bigger than normal per-stage rewards. If you're one or two stages from the next milestone, push for it even if it's hard — stalling at "milestone minus one" is a commonly-flagged mistake, since a milestone chest is worth several normal stage rewards combined.
Squad Strategy By Stage Range
| Stage Range | Recommended Squad | Why |
|---|---|---|
| Early (1-~50) | Tank squad | Durability carries through early waves; most players build Tank first anyway |
| Mid (~50-150) | Tank or Aircraft, whichever is stronger | Transition window — push with whatever has higher combat power |
| Late (150+) | Aircraft squad, DVA carry | DVA's burst clears priority targets fastest; the standard end-game PvE clear meta |
PvE here doesn't follow strict PvP type-counter rules, so a well-built squad of any type can clear regardless of "stage type." DVA (once her Exclusive Weapon is levelled) and Kimberly's Rocket Shadow are specifically called out as the strongest Aircraft and Tank carries for this mode.
Easy To Confuse With...
- Base Expansion — the early tutorial "deploy bombs to clear blocks" mode that Exploration Quest continues from
- Global Expedition — a separate, Season 6-only Awakening-shard mode, also wave-based but seasonal, not permanent
- The Armed Truck — a different green vehicle that parks outside your base — an AFK passive-loot collector, not combat. Easy to confuse purely from the color and parking location
- Hero Trial — daily-reset with attempt limits; Exploration Quest has neither
- Wanted Bosses — stamina-based, alliance-ranked, entirely separate
- Doom Walker — a daily, rally-based boss present every day, not tied to any specific event; not the same as Doom Elite (a zombie-tier enemy covered elsewhere)
- Rampage / Zombie Invasion — time-limited event-only, not permanent like Exploration Quest
Alert Tower Challenge (Honourable Campaign)
Alert Tower Challenge
PvEAlso called the Honourable Campaign — accessed via the Alert Tower building at your base (moved there from a Troop Helicopter icon in a past update). A recurring single-player mode split into three troop-type battlefields.
Structure
- Three separate battlefields, one per troop type: Iron Formation (Tank), Sky Police (Aircraft), Missile Frontline (Missile Vehicle). Only troop-matching heroes can fight in each.
- Unlock order: Tank battlefield is available first; clearing difficulty 5 there unlocks Aircraft; clearing Tank level 10 unlocks Missile.
- Hero lock: once a hero is deployed to one battlefield, they're greyed out and unavailable for the other two until the next reset.
- Reset cycle: every 2 days, resetting Sunday/Tuesday/Thursday. Maximum 2 levels completable per battlefield per cycle.
Rewards & Tips
Rewards Campaign Medals (spend in the Campaign Store before the weekly Monday reset), resources, and hero EXP — heroes below level 100 get a chance at a free level-up each battle here. Running a full formation of the matching troop type grants a +25% Attack bonus for that battlefield. If stuck on a level, temporarily moving gear from a lower-priority squad onto the squad attempting the harder level can provide enough of a one-time power boost to clear it.
Operation Falcon
Operation Falcon
PvEAccessed any time via the yellow helicopter icon — permanently available, not tied to any weekly schedule. Its mission mode is called Frontline Breakthrough: a stage-based Special Ops challenge that rewards free troops based on how many of your soldiers survive.
Structure: Prologue, Hard & Nightmare
Frontline Breakthrough is organized into three difficulty tiers — Prologue, Hard, and Nightmare — each containing 6 chapters, and each chapter containing 7-8 individual stages. Each stage starts you off with a minimal squad (as few as a single soldier); as you advance through increasing traps and attackers, you pick up additional troops, vehicles, and weapons along the way.
Once a chapter is fully cleared, its reward is one-time only — there's no daily reset to re-farm the same chapter again, so treat each chapter as a single payout rather than a repeatable farming loop.
How It Works
Deploy troops into a stage and try to keep as many alive as possible through to the end — surviving troop count directly determines your reward, and troops earned come out at the highest tier currently trainable in your Barracks. Upgrade your Barracks as much as possible before running Special Ops, since that determines the quality of troops you're rewarded. It's generally not worth starting Special Ops early unless troops are urgently needed. If a level goes badly and too many troops die partway through, restarting to preserve numbers is usually better than pushing on with heavy losses. More Special Ops missions unlock as your Headquarters level rises, and if you get stuck on a level, it's worth asking your alliance for help.
Arena (VS Arena)
Arena
PvPA hero-squad PvP system entirely separate from world-map or base combat — automated battles resolved once you set your squad, split across three distinct modes.
The Three Modes
- 3v3 Brawl — the main, always-available mode. 3-hero-squad vs. 3-hero-squad. You set both an attack squad and a defence squad; your defence squad stays active and can be challenged by others while you're offline.
- Storm Arena — a separate competitive mode that alternates with 3v3 Brawl on a 2-week cycle. When one is active, the other isn't.
- Apex Arena — the elite tier, restricted to accounts ranked Top 200 in Total Hero Power on their server, with eligibility re-checked every Tuesday.
- Rookie Camp — a practice warm-up mode for learning the battle system before entering ranked play, not a time-gated unlock challenge.
The One Habit Worth Doing Daily
Within 3v3 Brawl, you can give a thumbs-up to 3 opponents per day — this earns diamonds for roughly 30 seconds of effort, requires no wins, and costs nothing. It's described as the most commonly-missed easy income for new players, and worth doing regardless of how seriously you take competitive ranking.
Ranking & Rewards
Arena Coins are the ranking score — gained on wins, lost on losses. They are not a spendable shop currency (a real error in some older community guides, worth flagging since it may be repeated elsewhere). Weekly settlement rewards are based on your Arena Coin total and resulting rank at reset. Honor Points do not come from Arena — those come from Capitol Conquest (Desert Storm/Winter Storm) instead, a separate system.
Squad Building
Mono-troop-type squads unlock type-bonus multipliers that a mixed squad loses — the same principle as regular squad building elsewhere on this site. Attack and defence squads serve different purposes: defence is active 24/7 while you're offline and should prioritize durability, while attack squads can be chosen situationally per opponent and lean more toward burst damage. Using the identical squad for both is a commonly flagged mistake.
Progression-Stage Guidance
| Stage | Focus |
|---|---|
| Early game | Use Rookie Camp to learn the system; do the daily 3 thumbs-up without fail; ignore competitive ranking entirely for now |
| Mid game | Keep the daily thumbs-up habit; aim to win 5 daily matches; set and maintain a real defence squad |
| Late game | Track your Total Hero Power ranking — Apex Arena becomes a realistic target once you're near the Top 200 threshold |
Zombie Invasion (Golden Zombies)
Zombie Invasion
PvEAllianceWidely known by its community nickname "Golden Zombies" — a time-limited alliance event, not a permanent system like the others on this page. Runs on a biweekly cycle with a 3-day window, usually Wednesday through Friday, and is regularly cited as the single highest gold-yield event in the game.
How It Works
| Property | How It Works |
|---|---|
| Invading Zombies | Level 10 zombies that spawn in waves of 3, costing 10 Stamina per attack |
| Zombie Bosses | Tougher spawns costing 20 Stamina per attack, protected by a 10-minute alliance-only window after appearing so your alliance gets first crack before anyone else can pile on |
| Discoverer bonus | Whoever first spots and reports a Boss gets an extra reward sent by in-game mail |
| Format | Alliance-wide — most players farm ordinary zombies solo, then join a rally for tougher Bosses rather than attacking one alone |
Rewards & The Event Store
Every zombie kill pays out resources plus Courage Medals — 10 per ordinary Invading Zombie, more per Zombie Boss. Medals are spent in a dedicated Event Trade Store for the event's duration, stocked with Stamina, Legendary Chests, Exclusive Weapon Shards, Drone Parts, Purple Chests, and — later in the season — Oil. Because the store resets with the event, unspent Medals are generally best spent down before the 3-day window closes rather than saved.
Strategy
Stamina is the real bottleneck here, not troops or combat power, so stock up on Stamina items before the event window opens rather than during it. Farm ordinary Invading Zombies steadily throughout the 3 days for a reliable Medal trickle, and save your Stamina spikes for joining alliance rallies on Zombie Bosses rather than trying to solo one — Bosses hit much harder and are built around being tackled as a group. Expect heavy hospital and troop drain either way, so make sure hospital capacity is free before diving in.
Winter Storm Battlefield
Winter Storm Battlefield
PvPAllianceOne half of Capitol Conquest (alongside Desert Storm, a separate battlefield with its own building set) — a 10-vs-10 alliance battle fought on a dedicated map for Honor Points, themed around a nuclear silo exposed by a melting glacier. Desert Storm's exact mechanics aren't assumed to be identical.
Structures & Scoring
| Structure | Battlefield Points |
|---|---|
| Airdrop Supplies | 1,000 flat, for capturing a periodic supply drop |
| Nuclear Silo | 100 per second held — opens partway through the match, the single biggest scoring structure |
| Oil Refinery | 30 per second held — open from the start, the primary steady points source |
| Missile Site | 10 per second held, and automatically attacks all enemy-held buildings, damaging their stationed troops |
First side to 30,000 Battlefield Points wins immediately. If time runs out, whoever has more points wins — but if the score is exactly tied, both sides lose.
Schedule & Matchmaking
First becomes available the server's 7th week, with matches on Saturdays (Mondays instead during off-season periods). Requires Headquarters level 15+. Multiple matchmaking time slots run on battle day; once 10 commanders on each side confirm, everyone is automatically moved into the battlefield together, starting in a "safe zone" preparation stage (your side blue, the enemy red, no attacks possible yet) before real fighting begins.
Special Rules
- A genuinely separate troop pool: on entry, the highest-level units you can train automatically fill an independent Drill Ground just for the battlefield. These never appear in your base's real Drill Ground and don't leave the battlefield once the match ends — confirmed to be why participating doesn't touch your real army, base, or shield.
- Units can't die in battle — severely wounded troops are automatically healed for free once it ends.
- You can relocate your base once per minute during the match.
- All tech, VIP, base skin, title, decoration, and drone boosts still apply on the battlefield.
- Rallies are disabled and continuous marching isn't allowed, but multiple commanders can garrison the same building together.
Rewards
Separate from Battlefield Points, a Reward Points total resets every event and unlocks reward chests as it climbs. It's built from three sources: completing a match, your individual point ranking at settlement, and commendations/achievements earned during the match (MVP-style, one highest-value commendation per player per match) — each of the first two requiring at least 250,000 individual points to actually count.
Desert Storm Battlefield
Desert Storm Battlefield
PvPAllianceThe other half of Capitol Conquest, alongside Winter Storm — its own dedicated map and building set, not assumed to share identical mechanics. A weekly alliance-vs-alliance battle for Honor Points. In-story, a hurricane exposes a hidden weapon of mass destruction beneath the desert, and both sides race to capture the nuclear silo at its heart.
Map & Structures
The map is diamond-shaped, with each alliance's spawn zone sitting at an opposite edge — the hurricane forces you to enter from the edge of the map rather than dropping in anywhere. A single Nuclear Silo sits at the very centre, the single most valuable structure and the main prize of the match. Two Oil Refineries sit just outside each spawn zone — worth capturing fast, since they're the primary steady source of ongoing points.
Scattered further out are paired Strategic Facilities: Field Hospital (rapid troop healing), Science Hub (extra Teleports), and Info Centre (faster facility takeover) — each offering a passive boost to whichever alliance controls it, on top of the points it generates.
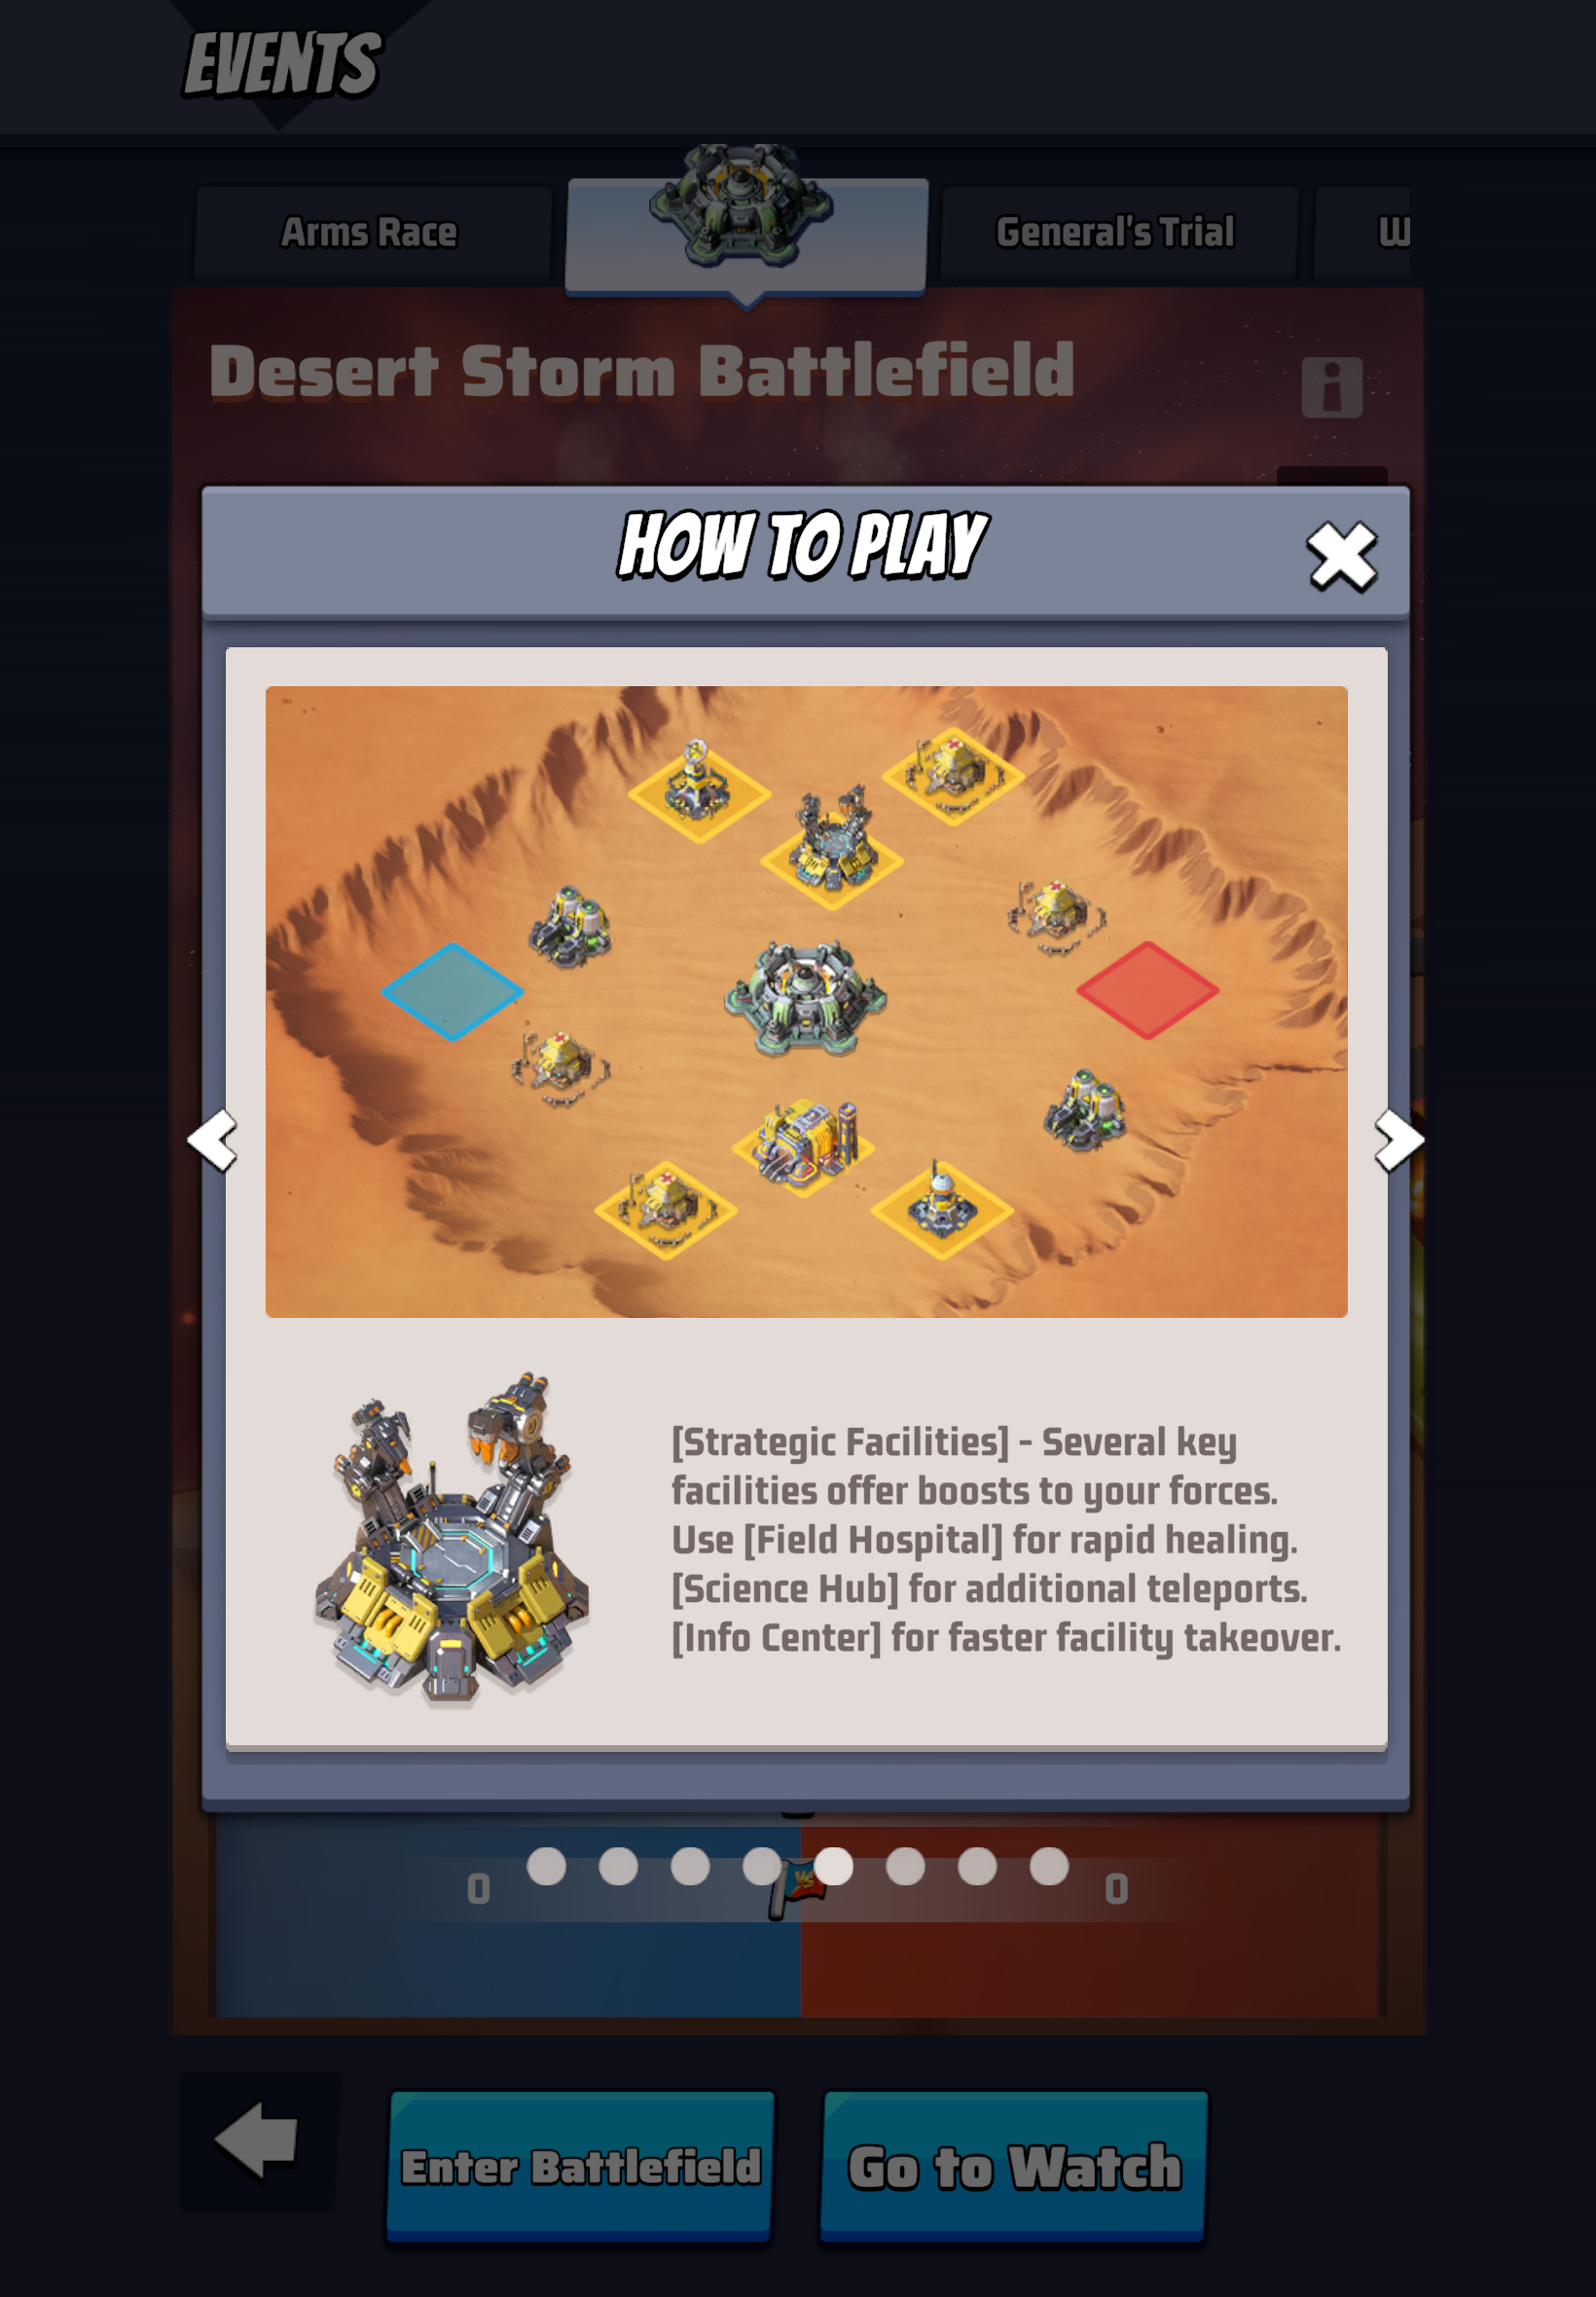
Official in-game "How To Play" screen.
Battlefield Points & Oil Wells
Any facility your alliance holds continuously generates Battlefield Points for as long as you control it — captured facilities show a running counter of the points they're producing. Breach and capture an enemy-held facility and any points it had banked don't just transfer cleanly — they scatter around the site as pickups, free for any commander nearby to grab.
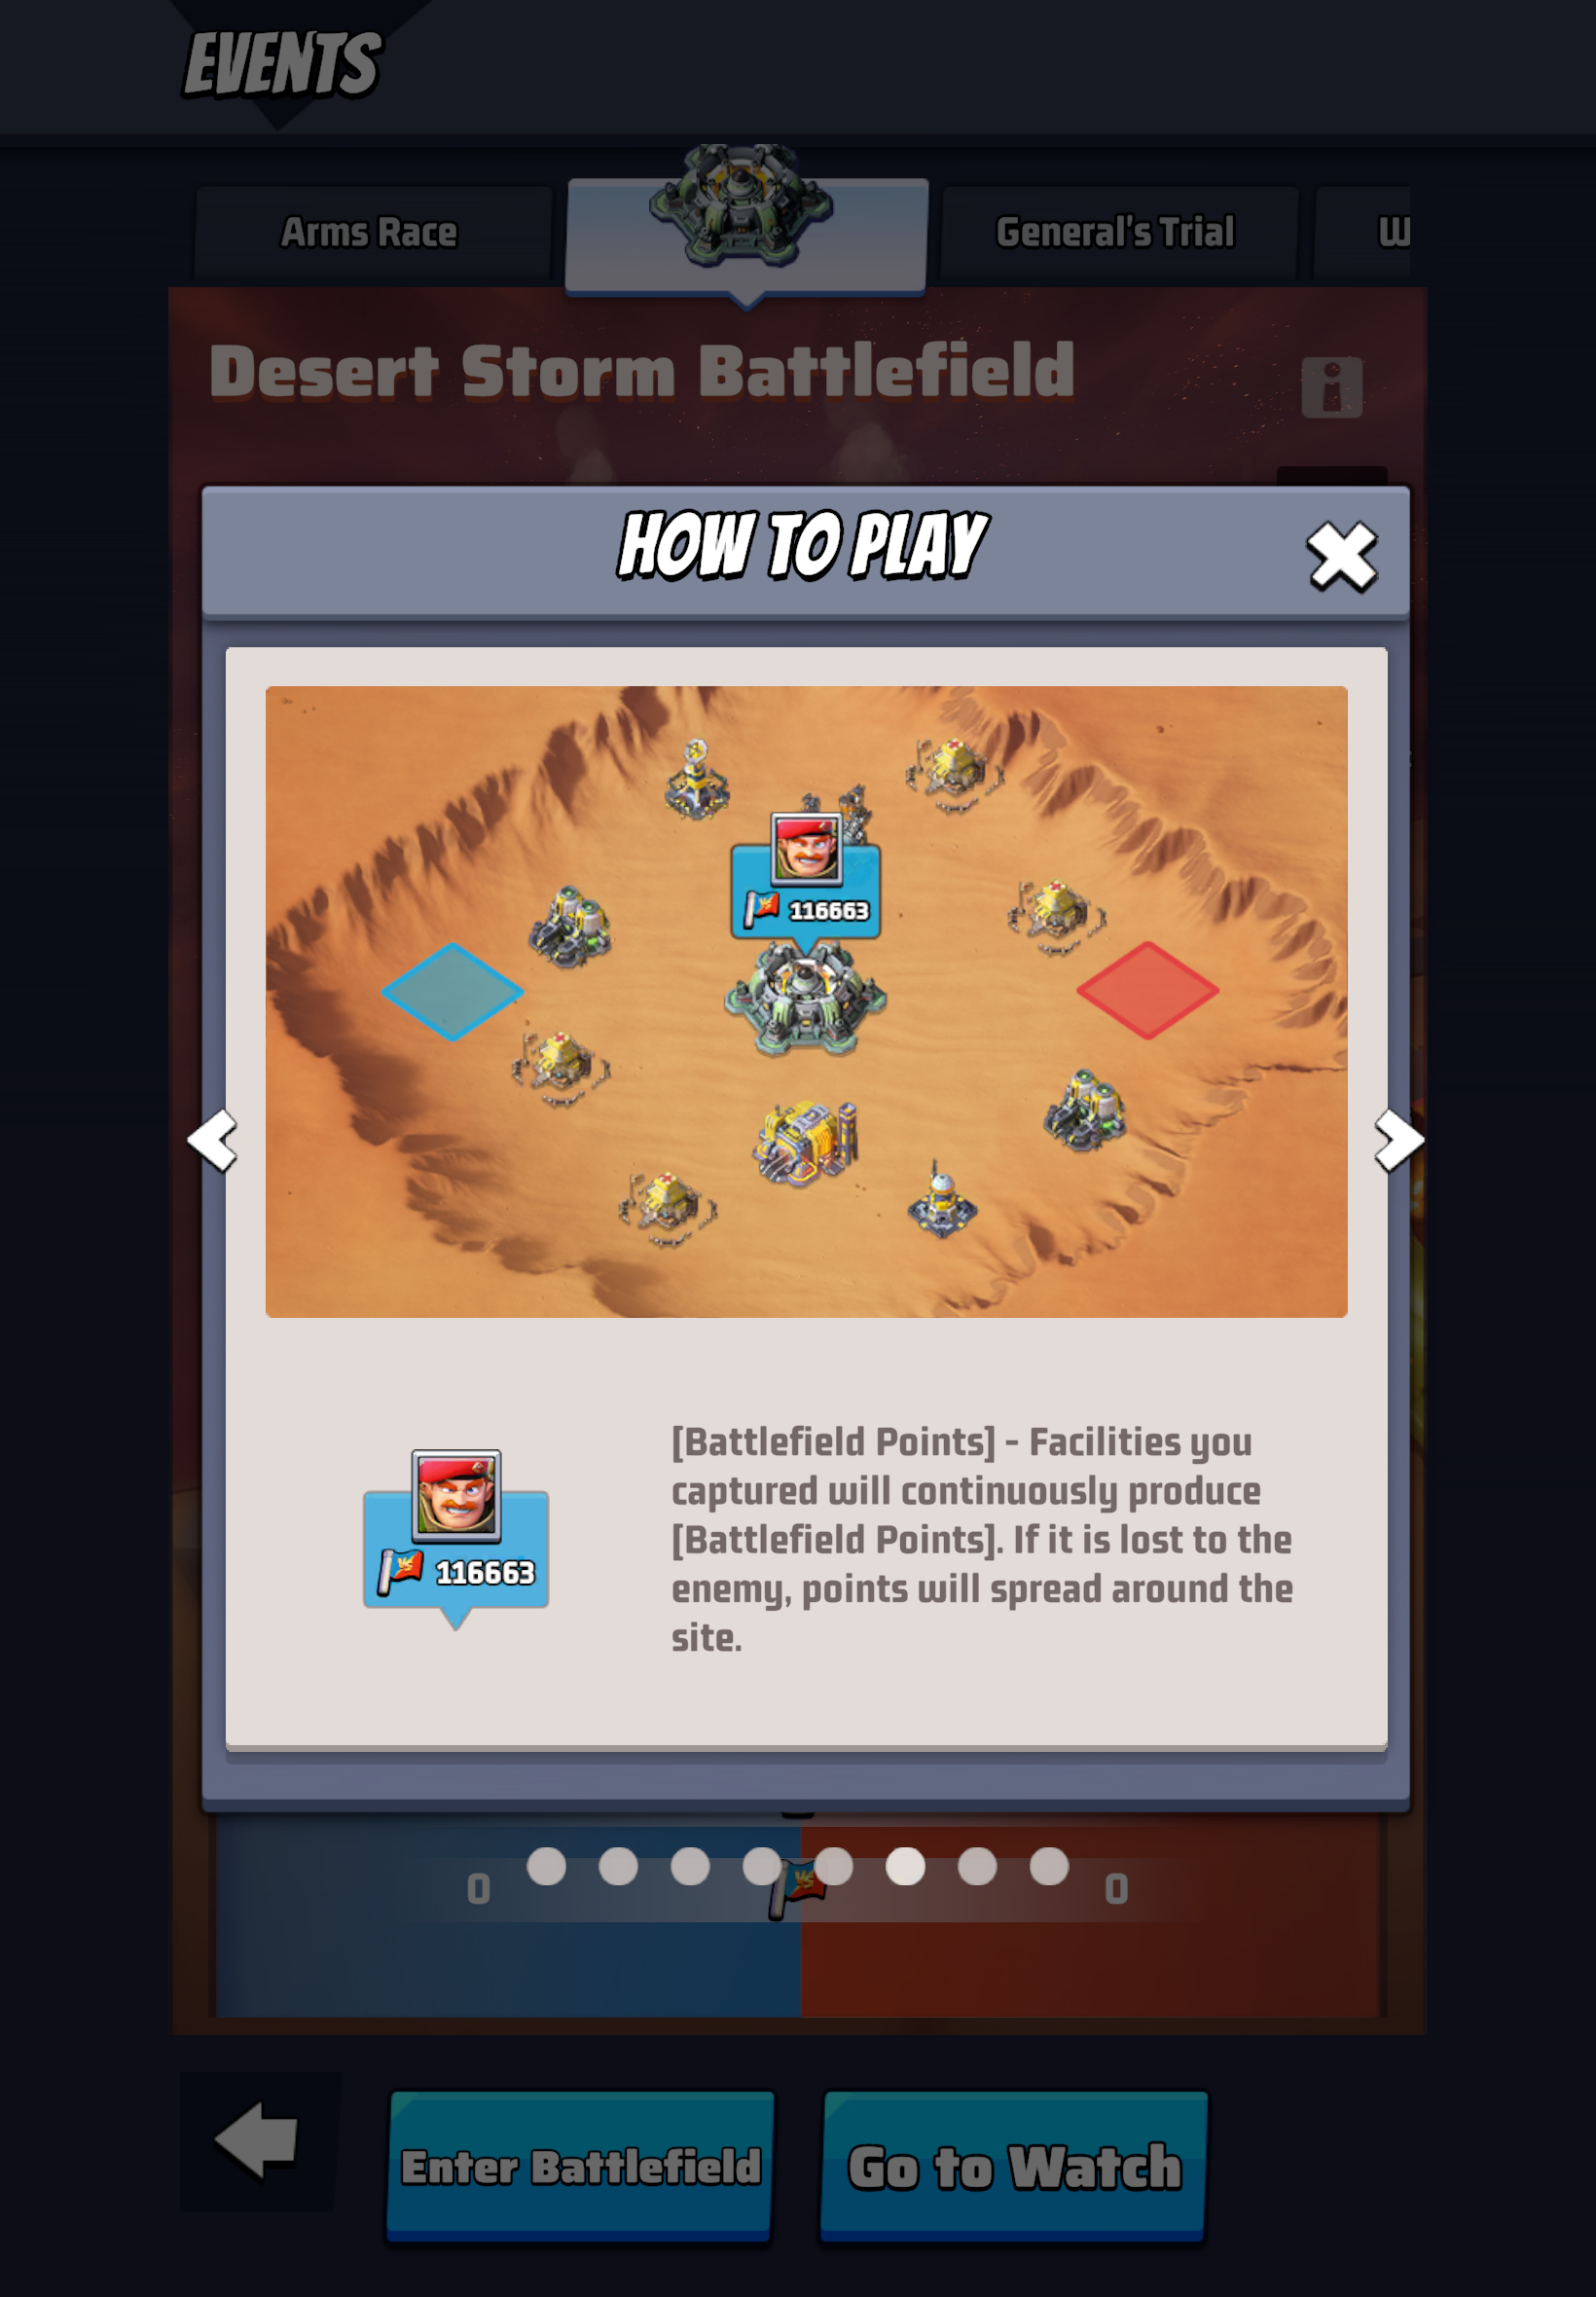
Official in-game "How To Play" screen.
Separately from the named facilities, small Oil Wells are scattered across the open map — send troops to one directly to collect Battlefield Points from it, without needing to capture and hold a whole facility.
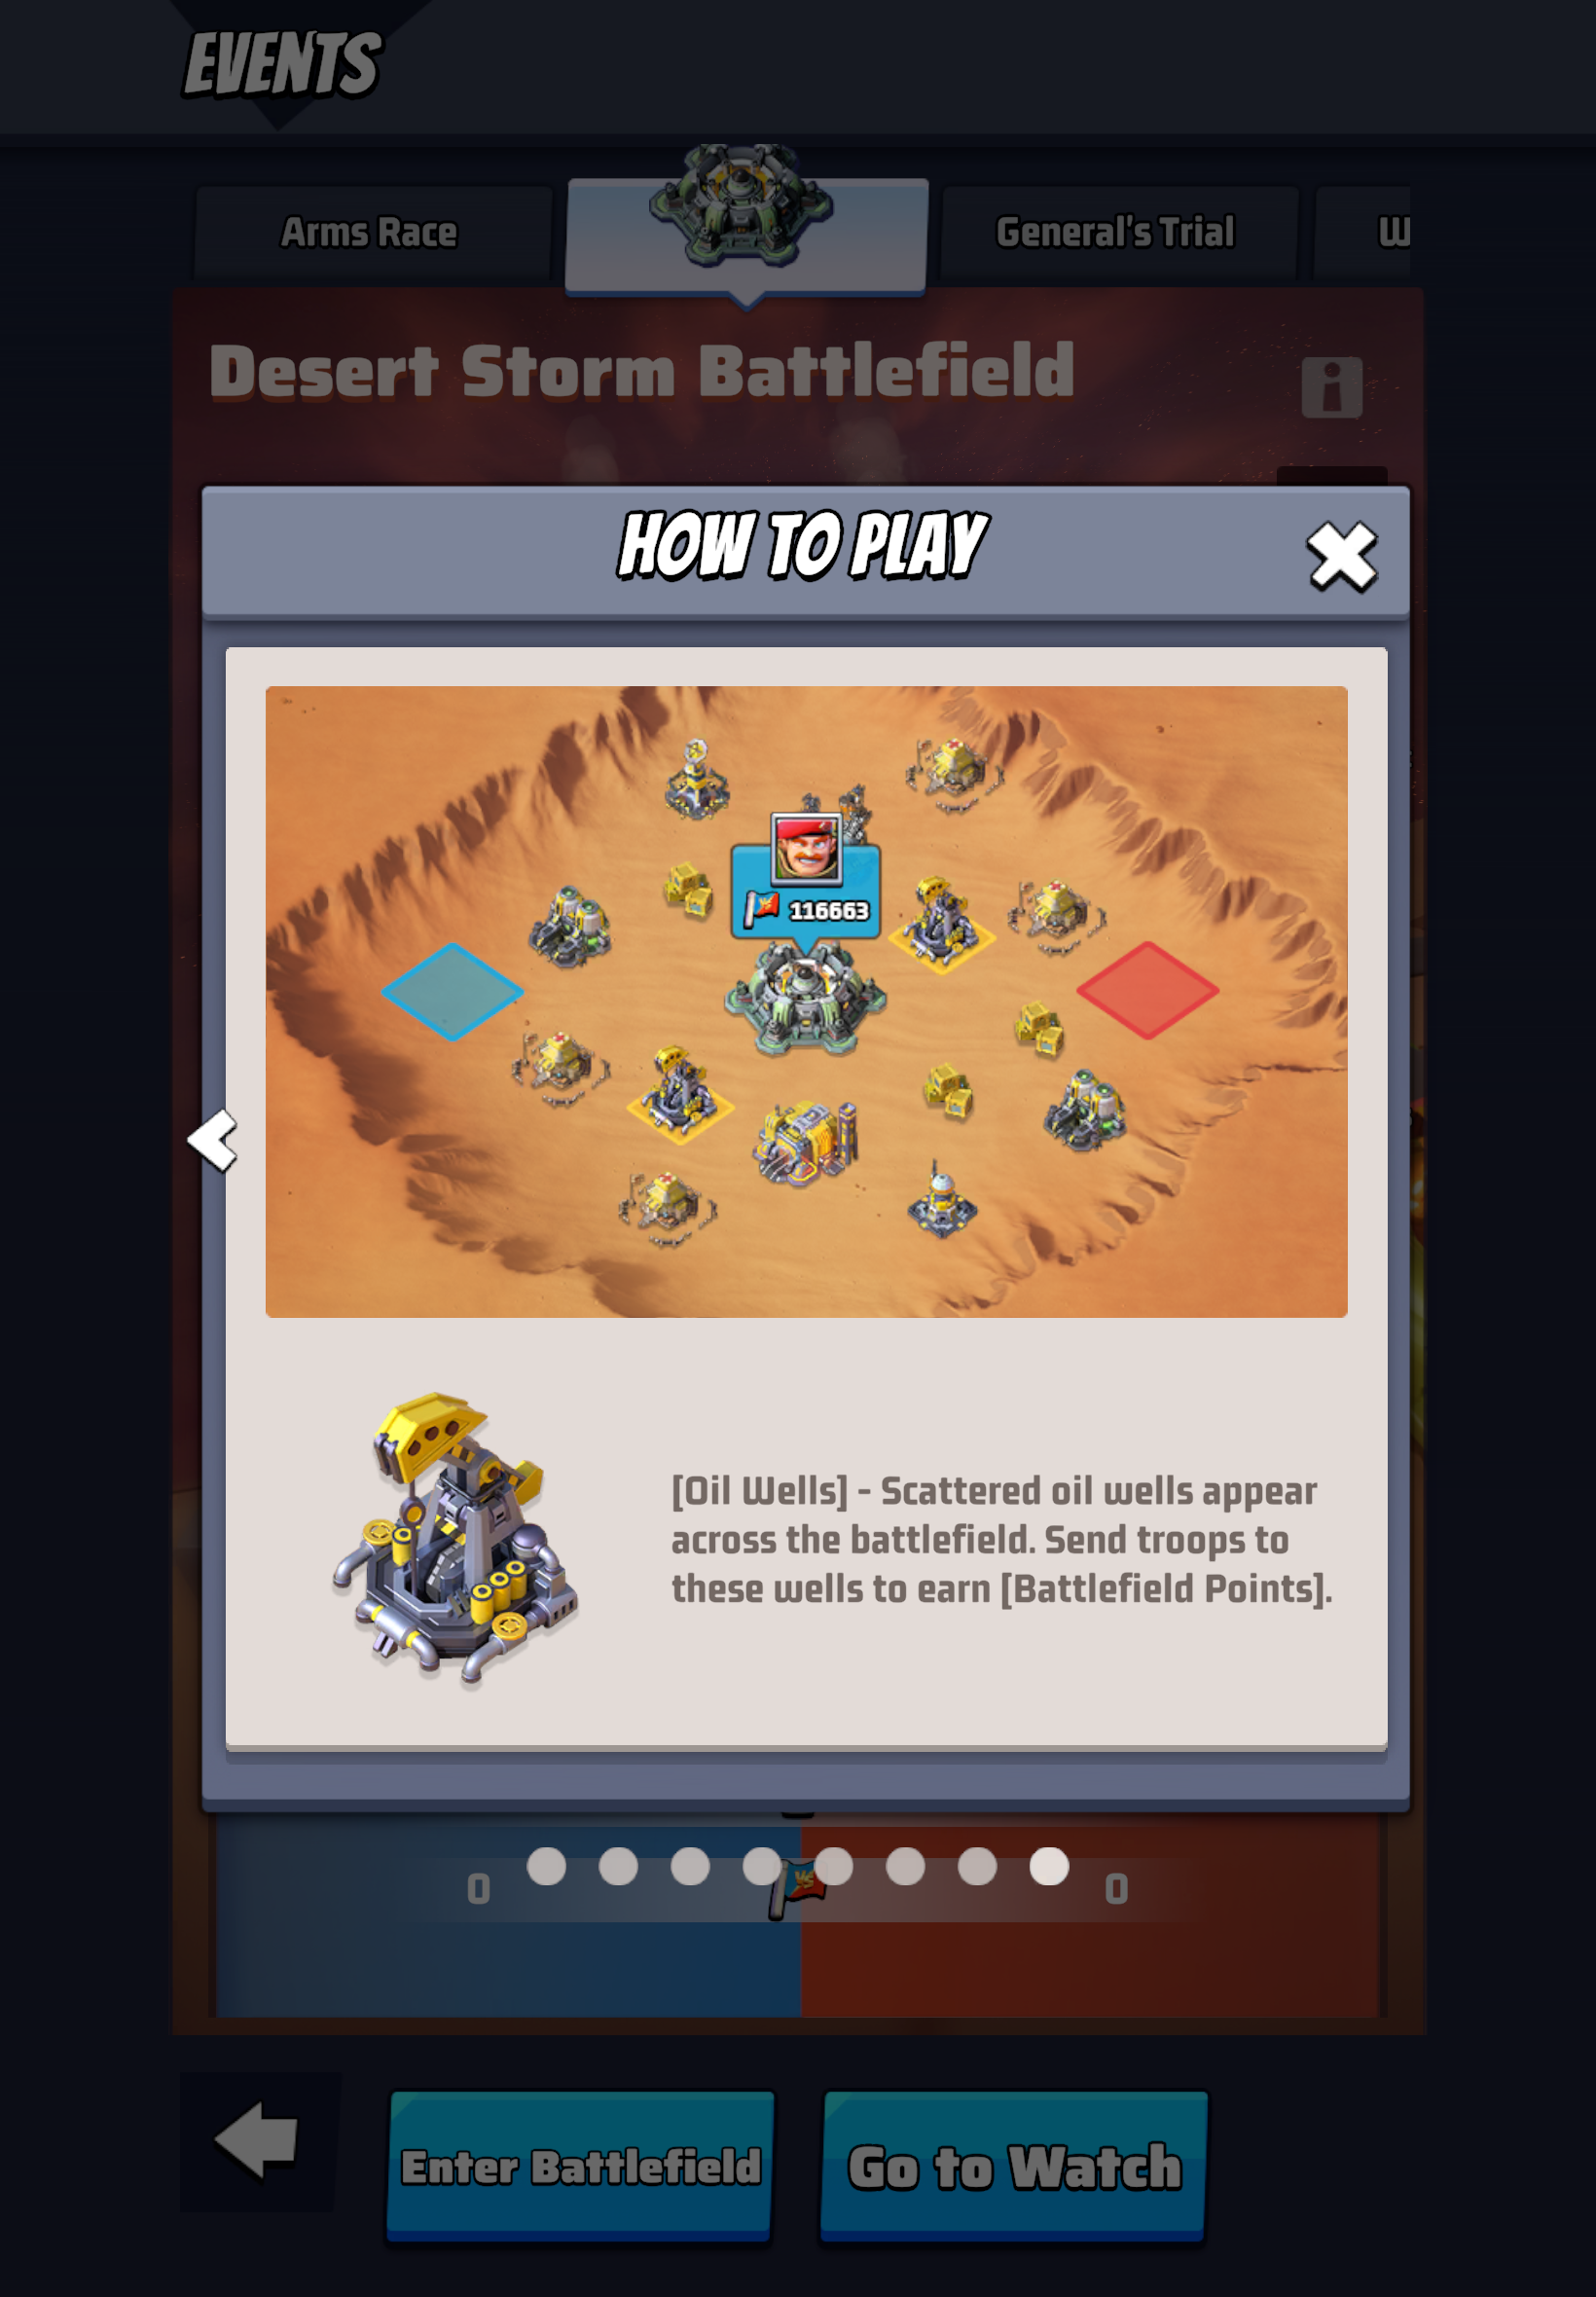
Official in-game "How To Play" screen.
Match Structure & Rules
A preparation stage runs first, then a 30-minute battle timer. Whichever alliance has more total Battlefield Points when the timer ends wins. Individual Points earned alongside — capturing/holding facilities and fighting enemy troops in the process — determine your own personal reward tier separately from the team result.
Troops don't permanently die here — they're automatically restored once the battle ends, so it's safe to commit without risking your real army. A free Teleport recharges periodically, faster if your alliance holds a Science Hub; worth saving rather than using casually for repositioning.
Schedule & Eligibility
Runs weekly: registration Monday through Wednesday, matchmaking Thursday, the actual battle Friday at the time chosen during registration. Requires Headquarters level 15+, and your alliance needs to rank in the Top 32 of its Warzone and have existed for at least 7 days. Teams run up to 20 main players plus 10 substitutes.
Rewards
Winning alliance members receive substantially more Honor Points and resources than the losing side, distributed partly through personal Individual Points score and partly through shared alliance reward chests.
Alliance Strategy: Role Assignments
A real R5 team briefing, sent to alliance members before a Desert Storm match. This is one player's approach, not the only way to run it — other role setups and strategies can work just as well:
- Before the match: remove all troops from your Wall so you don't lose them unnecessarily, then teleport to your assigned position. Focus on capturing objectives rather than chasing kills — controlling buildings and key points is the actual goal. Stay at your assigned position rather than teleporting around the map; everyone has their own role and location.
- 🟩 Green — Building Control: stay in your assigned building at all times, particularly the Hospitals, which always need as many defenders as possible. Don't leave your assigned building unless instructed.
- 🟥 Red — Strike & Defense Team: the Silo Strike Team. Before the Nuclear Silo opens, protect the Hospitals and Oil Refineries; once it opens, shift focus to attacking it and follow the strike team leaders' instructions.
- 🟪 Purple — Support / Free Runners: hold your assigned position early on; once the Silo opens, become a Free Runner — move around the map and reinforce wherever support is needed most.
The closing principle: victory depends on discipline and teamwork — no random attacks, don't abandon your assigned position without reason, stay focused on objectives, and follow the plan.
Wanted Bosses
Wanted Bosses
PvEAllianceA stamina-based, alliance-ranked world boss system, entirely separate from Exploration Quest despite a similar "boss fight" feel. Each Wanted Boss appears with a numbered code and a troop-type bonus, and coordinating who deploys with whom matters more than raw individual power.
Code Boss Coordination
A hero-assignment strategy for the three Code Boss types. No single "correct" squad exists — this reflects one experienced approach, not an official rule:
- Code 87 (Tank Boss, +50% bonus from Tank squads): Marshall and DVA up front, then Kimberly, Stateman, and Mason. DVA can be swapped for your best DPS hero if needed. Gear cannons go to Kimberly first, then Stateman, then Mason (only once surplus remains). Marshall needs full defense gear, and Mason's "Zombie Cleaner" skill should be at least level 20.
- Code 39 (Aircraft Boss, +50% bonus from Aircraft squads): Marshall and Kimberly up front, then DVA, Morrison, and Skyler. DVA gets the best attack gear, followed by Morrison then Skyler — test swapping Skyler/Kimberly if needed. Marshall stays frontline throughout.
- Code 64 (Missile Boss, +50% bonus from Missile squads): Tesla and Swift up front, then Fiona, Adam, and Marshall. If you don't have a dedicated Missile squad, fall back to your top 4 damage dealers instead — DVA, Kimberly, Stateman, Mason, Skyler. Marshall is mandatory regardless: no buffs means no real damage.
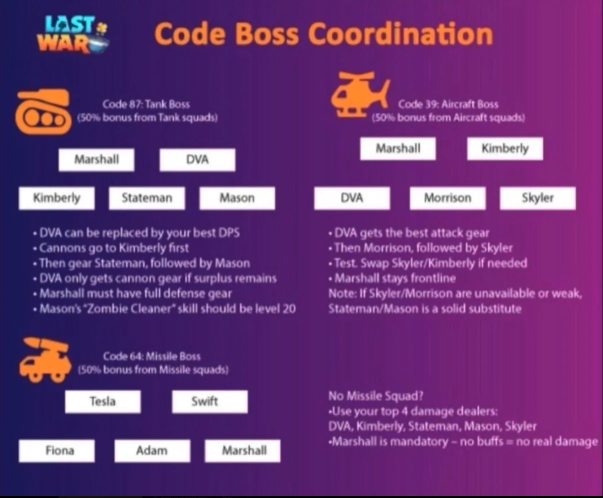
Community-sourced strategy guide.
Doom Walker
Doom Walker
PvEAllianceA powerful boss that wanders the world map every single day — not something restricted to a special event window. Fought through alliance rallies rather than solo attacks, tied to a daily Radar Mission that asks you to hunt one down. Available to bases at Headquarters level 8 and above. Not the same system as Doom Elite, a separate zombie-tier enemy covered elsewhere on this site. The game also periodically runs a separate "Doomsday" event (see below) that boosts how often they spawn and layers extra rewards on top of everything here — but the core mechanics below apply every day, event or not.
Finding & Attacking One
Each day's Radar Mission points you toward a Doom Walker to defeat, but on a normal day there's no dedicated list of active ones — finding one otherwise means manually scanning the world map.
Starting a rally against one costs 20 Stamina; joining a rally someone else already started is free, making it accessible even on days you're short on Stamina.
The Power Threshold — And Why It Drops
Every squad participating in a rally against a Doom Walker must individually meet a minimum strength requirement for that attack to succeed. Falling short doesn't just do less damage — the attack can fail outright, and a failed attack risks the Doom Walker retaliating against the rally initiator's base, while leaving it weakened for other alliances to finish off cheaply.
A Doom Walker's remaining power is shown as a percentage that drops as it takes hits. Because the strength requirement scales with its current power rather than staying fixed at the level's starting value, this is exactly why the standard alliance approach works — strongest squads hit first while it's at full power, then progressively weaker squads can finish it off once enough percentage has been chipped away.
Starting Strength Requirements By Level
| Doom Walker Level | Required Strength Per Squad |
|---|---|
| 100 | 1.4M |
| 110 | 3.3M |
| 120 | 6.7M |
| 130 | 10.757M |
| 140 | 11.715M |
| 150 | 12.715M |
| 160 | 14.916M |
| 170 | 16.014M |
| 180 | 17.253M |
These are full-power requirements at the moment a Doom Walker spawns — expect them to drop as its displayed power percentage falls from earlier hits. The game has kept adding higher levels over time (130, 150, 190, 200 and beyond as of writing), so treat this table as a snapshot rather than a permanent ceiling.
Daily Rewards & "First Blood"
Every kill pays out resources, Drone/Hero EXP, chests, and Survivor power that scale up with the Doom Walker's level — a Level 100 kill is cited around 2.5K Drone EXP and 680K Hero EXP, up to roughly 4.2K Drone EXP and 8.1M Hero EXP at Level 220, alongside Iron, Food, Gold, and other rewards at the higher end.
The first Doom Walker you kill each day grants extra "First Blood" rewards on top of the normal payout — but you only get this once per day, so it's worth saving for a level worth the bonus rather than using it on the first low-level one you happen to find.
The Doomsday Event (A Periodic Bonus Layer)
Doomsday doesn't introduce a different boss — it's the same everyday Doom Walkers, just organized into a structured, timed objective. Shown in the Events menu roughly every two weeks, it temporarily increases how often they spawn (every 4 hours during the event window, typically destroyed within minutes given how much server attention they draw), with a countdown at the bottom of the event page showing when they'll next reset. Some versions of the event page also show a searchable list of currently-active Doom Walkers (labeled "Alliance Threat" and "Warzone Threat" in available screenshots) — this doesn't appear to be universal across every account, so manually scanning the map remains the reliable fallback either way.
During this window, first-kill rewards give the same seasonal resource bundle regardless of which level you get the kill on, claimable up to 3 times — worth timing your alliance's first attempts for just after the season actually starts in your region, so none of those 3 are wasted early. The event also adds a server-wide participant ranking (based on total damage dealt, with separate rewards for top performers) and server-wide achievements for the first destruction of a Doom Walker at each level, the total destroyed server-wide, and the number of players who helped.
Strategy
Only commit a squad once you've checked its strength genuinely clears the current requirement — an underpowered hit risks failing outright and inviting retaliation, rather than contributing partial progress. Coordinate so your alliance's strongest squads open on a fresh, full-power Doom Walker, then let weaker squads clean up once its percentage has dropped enough to be within their reach.
The Queen's Revenge
The Queen's Revenge
PvEAllianceA Warzone-wide defensive siege event tied directly into Season 1's story — see Seasons & Story for the full Crimson Queen lore. Runs during the off-season window at the end of Season 1, when the Crimson Queen besieges several Cities across the Warzone at once. Community reports suggest each season gets its own re-themed version of this off-season event with a different antagonist, though only Season 1's version is confirmed firsthand here.
How The Siege Works
The Crimson Queen sieges several Cities every Tuesday and Thursday. Your alliance's R4/R5 set one or more Defense Target(s) — the specific City/Cities your alliance is responsible for — and everyone garrisons troops there ahead of the attack.
Attacked Cities come in Gold/Silver/Bronze difficulty (tap the difficulty icon on the City card to see exact enemy detail). Rewards are not affected by which difficulty you're assigned, so Defense Targets should be chosen to match your alliance's actual power rather than to chase bigger rewards.
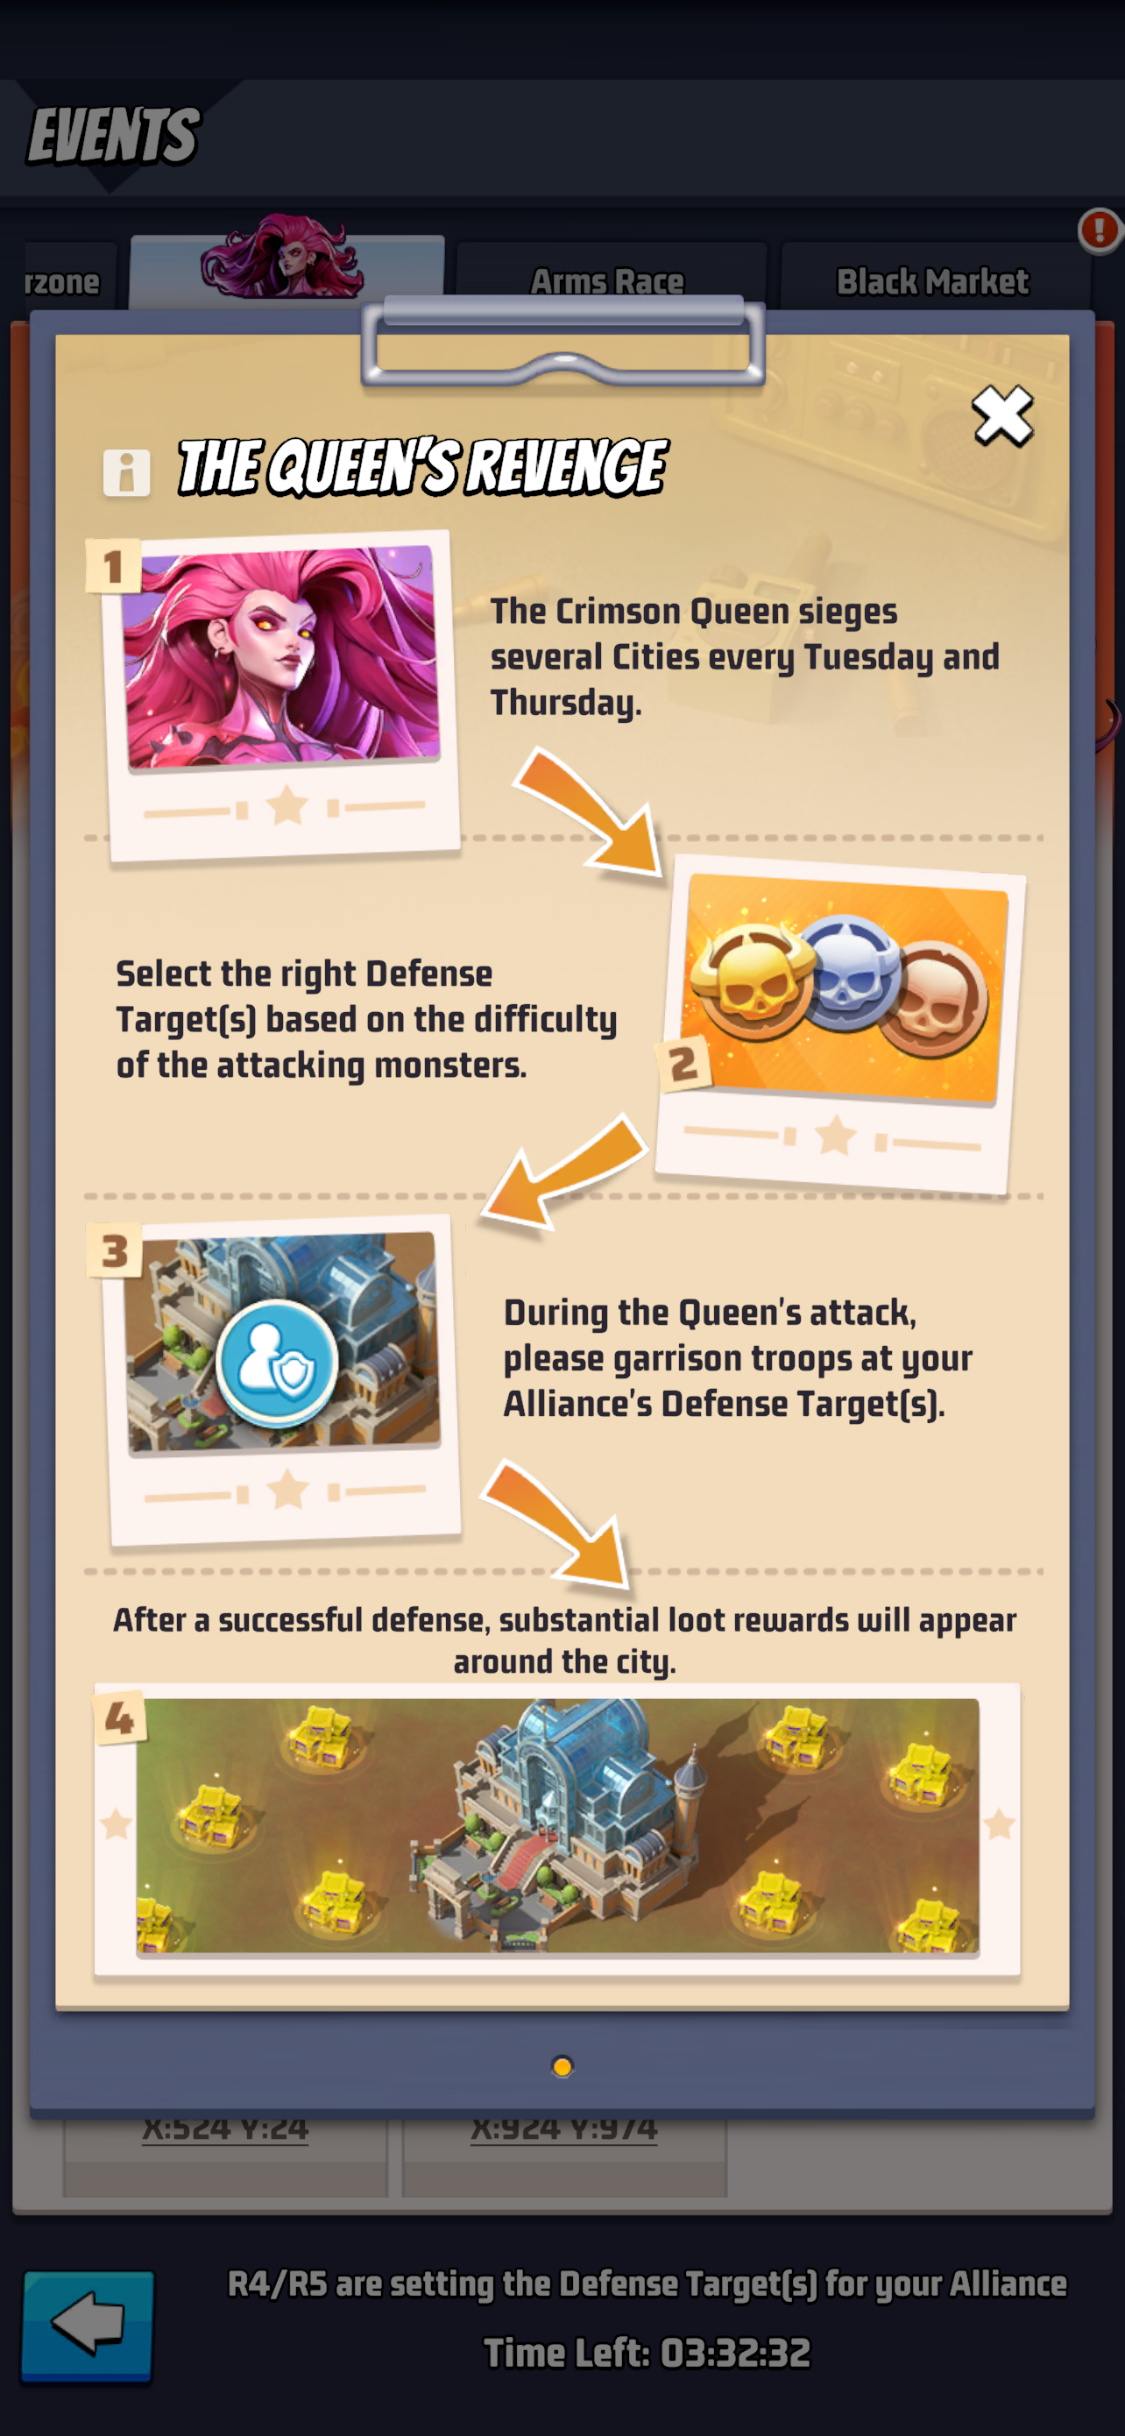
Official in-game "About the Event" screen.
Waves, Durability & Rampage Mode
Each City under siege faces a total of 20 waves of Crimson Troops. If a wave defeats every defender, it deals 1% Durability Damage to the City and lingers nearby to attack again shortly after — troops need to be sent back to re-garrison as soon as possible rather than left to accumulate repeated hits.
Once the 20th wave has appeared, any Crimson Troops still standing enter Rampage Mode, dealing 10× their normal Durability Damage — a serious late-siege escalation that makes holding the line through all 20 waves far more important than any single earlier wave.
Rewards
A successfully defended City (Durability never reaching 0) spawns numerous loot crates around it, claimable by every Commander in that Warzone — not just the defenders. If Durability does hit 0, the defense fails outright and no rewards appear at all.
If every City in the Warzone is successfully defended during the final siege, the whole Warzone additionally receives a Warzone Emblem — Bell Tower, a commemorative reward marking the Crimson Queen's complete defeat.
The Capitol
The Capitol
PvPAllianceA Warzone-wide seat of power, fought over through Capitol Conquest on the Winter Storm and Desert Storm battlefields. Whichever alliance comes out ahead takes control of the Capitol, and its leader becomes President for the term — with the power to open up six further titles to applicants from anywhere in the Warzone, not just their own alliance.
The Capitol Itself
The Capitol is a defended structure on the Warzone map, ringed by four Giant Cannons, belonging to whichever alliance currently controls it (shown as its "City Owner" when you tap it). Separate from the President and title system below, the Capitol's own level grants the controlling alliance a passive bonus — a Level 7 Capitol, for example, grants +10% March Speed alliance-wide.
The President & Six Titles
Beyond running the Capitol, the President can open six further titles to the whole Warzone. This is genuinely open server-wide rather than restricted to the winning alliance — confirmed live with a Vice President and five Secretaries pulled from four entirely different alliances, all serving under the same President at once.
| Title | Bonus |
|---|---|
| President | Reported to grant +5% Hero HP, Attack, and Defense while in office |
| Vice President | −20% construction time, −20% research time, −10% training time |
| Secretary of Strategy | +20% hospital capacity, +20% troop healing speed |
| Secretary of Defense | +20% training camp capacity, +20% troop production speed |
| Secretary of Development | −50% construction time, +25% research speed |
| Secretary of Science | +50% research speed, −25% construction time |
| Secretary of Interior | +100% resource gathering from mines |
Applying For A Title
Zoom in on the Capitol and tap Manage, then Title Assignment, then pick the title you want and tap Apply. Applying requires Headquarters level 16+. Successful applicants join that title's Auto-appointment list (up to 50 deep), and each person holds the title for about 5 minutes before it automatically rotates to the next name in the queue — so fresh openings come around every few minutes even when the list is busy.
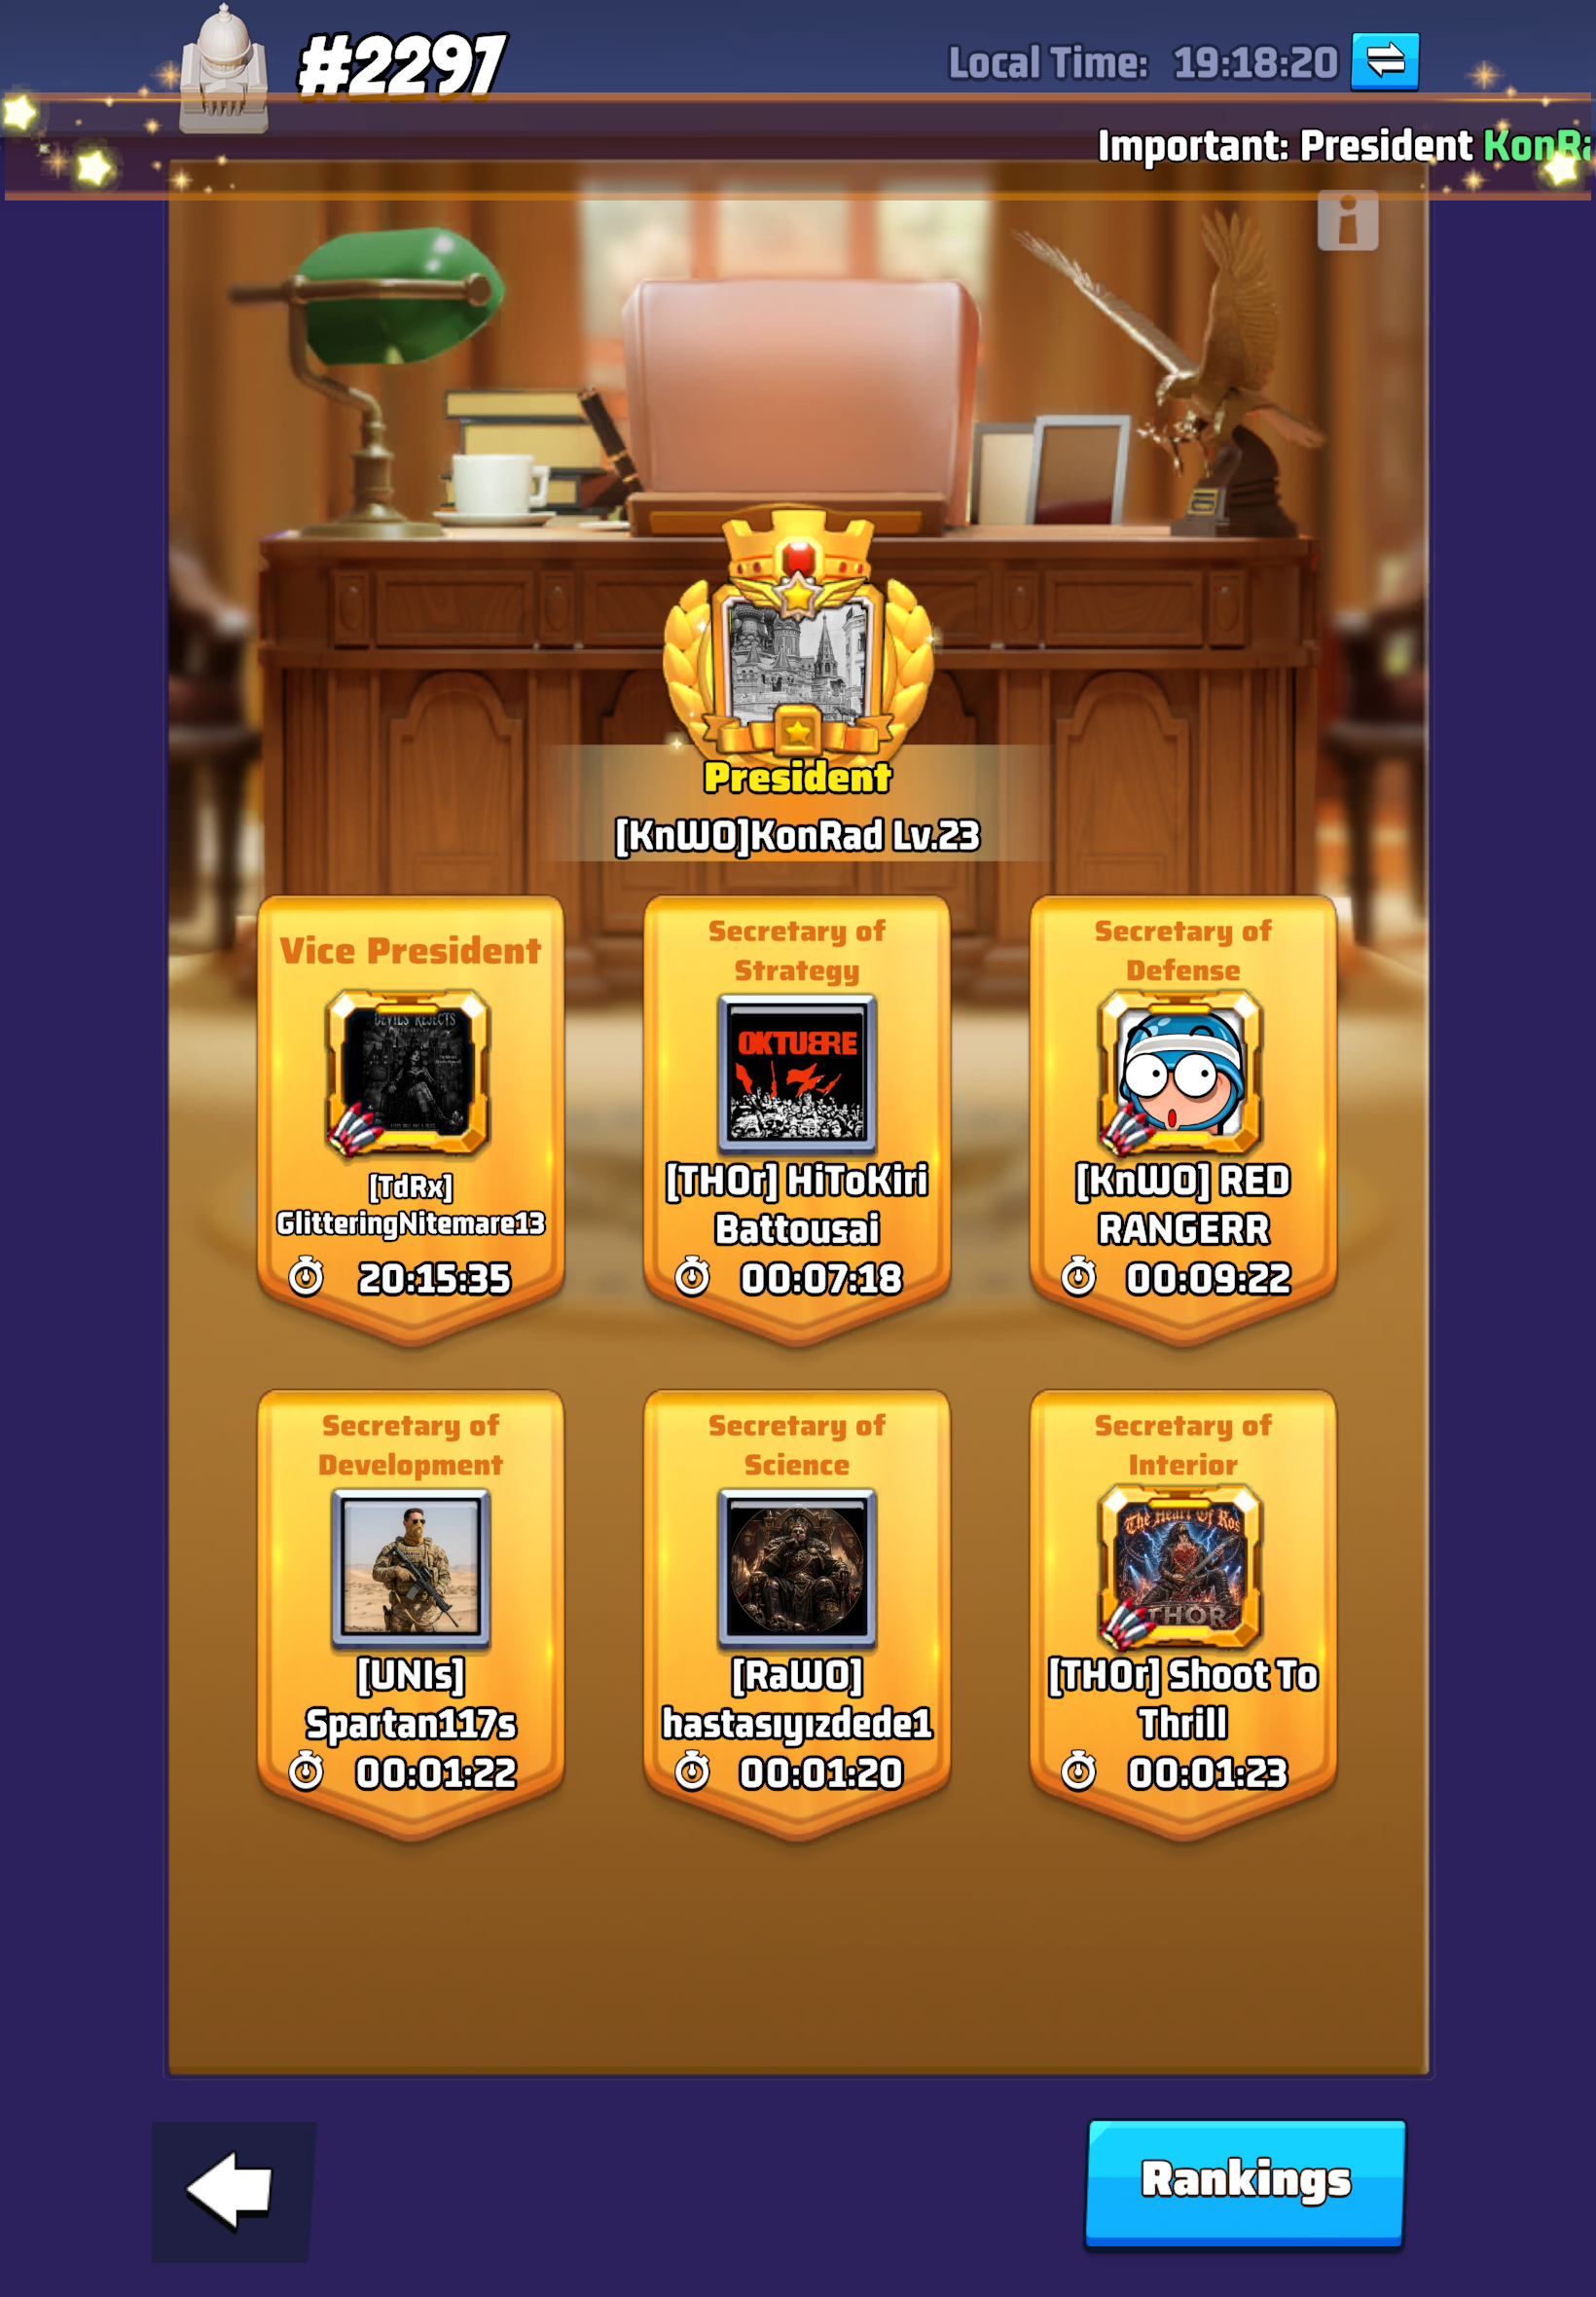
A real in-game example: Vice President and five Secretaries, each from a different alliance, serving under one President.
Other Capitol Options
The Manage panel also has Capitol Rewards, Past Presidents, President Skill, President Mail, and Warzone Badge buttons — all present in-game, but their exact effects aren't documented here yet.
Rare Soil War
Rare Soil War
PvPAllianceSeason 2 (Polar Storm)'s own headline alliance-vs-alliance event — commonly nicknamed "Furnace War(s)" by players, after the single structure it's fought over. Not the same system as Winter Storm Battlefield or The Capitol — those are recurring, season-independent systems; Rare Soil War is specific to Season 2's map and story, tied to Emperor Boreas. Runs weekly from Week 4 through Week 7.
The Alliance Furnace
From Day 1 of Season 2, an alliance can place its Alliance Furnace on any Level 1 territory tile and begin repairing it — activation takes up to 20 members' worth of reinforcement. Once active, it does two things at once: it generates heat for allied bases nearby (helping offset the season's severe cold, only within its effective range — being near the furnace matters), and it produces Rare Soil, the resource that determines your alliance's season-end ranking and rewards.
How The War Works
Alliance leadership (R4/R5) declares war on a rival alliance. The attacking side has a 40-minute window to destroy the defending alliance's Furnace outright; the defending side just needs to keep it standing until time runs out. Up to 3 alliances can simultaneously declare war on the same furnace, so a defense can face attackers from multiple directions at once. Matchmaking is bracketed by alliance rank rather than fully open.
Rewards & Late-Season Escalation
Winning an attack steals a percentage of the losing alliance's accumulated Rare Soil — 20% in Weeks 4–5, rising to 30% in Weeks 6–7. Since Rare Soil is also the season-ranking currency, a single lost defense late in the season can undo weeks of accumulation, which is why the final two weeks draw by far the most coordinated attention.
The wider season builds toward this: Weeks 4–6 are mostly about capturing territory (villages and towns first, then contested mid-tier cities), with Rare Soil War itself running throughout. Weeks 7–8 are the season's actual climax — alliances converge on the map's center to fight Emperor Boreas himself and seize his stronghold, a battle similar in spirit to Season 1's Capitol fight but against the season's own boss rather than just rival alliances. Server/worldwide alliance rankings, based on total Rare Soil collected, are finalized at the end of Week 8.
The Warlord Missile
A one-shot, alliance-leader-only weapon available during these wars — fired directly at a target for heavy, instant damage, capable of devastating a furnace or a tight cluster of nearby bases in a single hit. Worth planning around both offensively (a way to break a stubborn defense fast) and defensively (a reason not to stack every defender's base directly on top of the furnace — see the note below).
Temperature & Defense
Temperature governs far more than Rare Soil War alone — it's the core mechanic running through all of Season 2. The map ranges from around -15°C at the edges to as low as -80°C near the Capitol at the center. Base temperature affects resource output, unit healing, morale, and combat performance directly — commonly cited around +40°C giving up to a 90% bonus across those. Drop below -20°C and a 5-minute freeze warning starts; staying frozen blocks rallies and relocation entirely, and defrosting needs 5 continuous minutes back above -20°C. Heat sources include your Personal/High-heat Furnace, the Alliance Furnace, captured cities (roughly 5–60°C depending on level), and later research/building unlocks.
For Rare Soil War specifically: set your Personal/High-heat Furnace to Overdrive (burns Coal, but keeps working even while you're offline) before a fight, and use Recon Planes to warm a frozen ally's base (+2°C, temporary) if theirs has dropped too low to act.
There's a genuine, unresolved tactical debate on base positioning worth knowing about rather than treating as settled: some guides recommend tightly surrounding the Alliance Furnace with your strongest members' bases to physically deny the enemy a place to land nearby. Others warn this backfires against the Warlord Missile above — a single well-placed hit can catch many tightly-clustered bases in one blast. Treat it as a real tradeoff to weigh with your own alliance leadership, not a single correct answer.
Crystal Event
Crystal Event
PvEA newly-added system (introduced August 2026), built around a dedicated currency, Amethyst Crystal, earned two ways and spent in its own shop. The eligibility threshold is Day 1 of the Season 1 pre-season — any server at or past that point already qualifies, including ones deep into later seasons, since this rolled out as a global update rather than a per-server season milestone. The only other requirement is Base Level 20+. See Crystal Factory on Buildings & Base for the building itself.
Two Income Sources
The Crystal Factory is your steady baseline: once built, it passively produces Amethyst Crystal over time, upgraded using Crystal Ore earned from Daily Task progress chests (Crystal Ore isn't affected by resource multipliers). The Crystal Boss is your active daily source — appearing on the world map Monday through Saturday, resetting at 00:00 server time and staying up for 23 hours, with up to 3 challenge attempts per day.
Fighting The Crystal Boss
Attacks are individual troop dispatches only — no rallies. Type-counter bonuses (Tank/Aircraft/Missile Vehicle) don't apply to this fight, but fielding 5 heroes from the same Faction does grant a damage bonus. A notably long list of temporary buffs is disabled for the fight: War Fever, Charge Battle Flag, Tactics Card active skills, PvE Tactics cards, season military-rank buffs, and fish-consumption buffs all don't apply — only hero deployment bonuses carry over, so raw squad strength matters more here than usual.
Rewards include Amethyst Crystal, Universal Speed-ups, Hero Shard & Exclusive Weapon choice chests, and Upgrade Ore. Damage-based rewards reset weekly; achievement rewards run per season.
The Crystal Shop
Amethyst Crystal (from both the Factory and the Boss) is spent here on high-value items — Gold/Silver Bricks, Diamonds, Weekly Pass [Take All] Vouchers, Total Mobilization Vouchers, and occasionally hero shards or Exclusive Weapon materials, though exact stock rotates. Since stock and purchase limits refresh on a recurring timer, the general advice is to spend down toward zero at each reset on whatever's scarcest or highest-impact that cycle, rather than hoarding Amethyst Crystal indefinitely.
What Isn't Confirmed Yet
This event only launched days ago, and sources disagree on some of the finer details — worth treating the following as provisional rather than settled: the Crystal Factory's exact production rate and storage cap (it does have one, but the precise hours-of-production limit isn't consistent across sources), and the Crystal Shop's exact reset date.
One thing that does now look settled: the event isn't a fixed-length window tied to when your own server's Season 1 began. An account on Day 204 (deep into Season 2 territory, well past any 60-day window measured from their own Season 1 start) got the Crystal Factory the moment the update rolled out, same as everyone else — confirming this is an ongoing system running alongside every season, not a per-server countdown.