Troop Types & the Counter Triangle
Three Troop Types
Troops come in the same three types as heroes: Tank, Aircraft, and Missile Vehicle. Each hero leads troops of their own type into battle, and the same rock-paper-scissors counter system applies — the counter takes 20% less damage from the type it counters:
Troop Tiers: T1 Through T11
T1 - T9: The Standard Ladder
Troop tiers unlock progressively as your Barracks level rises, which is itself gated by your HQ level. Each tier is a straightforward power increase over the last — higher attack, defense, and load capacity per troop. T9 marks the first major power spike past the mid-game and is generally the most important tier to reach before T10 becomes available.
The exact Barracks level needed to unlock each tier:
| Barracks Level | Max Troop Tier Unlocked |
|---|---|
| 1 | T1 |
| 4 | T2 |
| 6 | T3 |
| 10 | T4 |
| 14 | T5 |
| 17 | T6 |
| 20 | T7 |
| 24 | T8 |
| 27 | T9 |
| 30 | T10 * |
* Reaching Barracks 30 alone isn't enough for T10 — see the Special Forces research requirement below. The Barracks level is necessary but not sufficient on its own.
T10: The Endgame Tier
T10 is unlocked through the Tech Center's Special Forces research tree, specifically four gatekeeper nodes: HP Boost III, Attack Boost III, Defense Boost III, and Unit X research. These four nodes represent a substantial research investment. Once unlocked, T10 becomes the foundation of most endgame lineups, improving attack, defense, survivability, and load capacity in every engagement.
T11: Promoted, Not Trained
T11 works differently from every earlier tier — you can't train T11 directly. Instead, existing T10 troops are promoted to T11. Unlocking the tier requires several things at once: Season 4's off-season, HQ level 27+, a Barracks at level 35, the Armament Institute built, and all four Armament researches (Helmet, Body Armor, Protective Gear, and Weapon, completed in that strict order) at 100%. The final unlock itself costs roughly 120,000 Armament Materials, 200 Armament Cores, and 1.2 million Oil. Most players need several weeks to a few months to get there — the research is the bottleneck, not the Barracks upgrade.
T11 Specializations: Armored Trooper vs. Assault Raider
Once unlocked, T11 troops come in two switchable specializations, changeable every 72 hours:
- Armored Trooper — Battle Protection, reducing severe wound rate by 5%. Best for defense: holding your base, or being the defender in season wars.
- Assault Raider — Iron Will, reducing the stat penalty for marching under-capacity by 10%. Best for attacking events and being the aggressor in season wars.
Both specializations share the same base stats (roughly 5-10% above T10). After unlocking T11, the four Armament researches can also be pushed further for star-level bonuses — but bonuses only activate once all four branches reach the same star level, so it's best to raise them together rather than favoring one.
Getting Multiple Barracks (Up To 4)
You aren't limited to a single Barracks — up to 4 can be built, which is what makes Waterfall Training below possible. Each additional Barracks is unlocked through its own research in the Tech Center's Development section, rather than through the Barracks building itself.
The 4th Barracks specifically is the 13th research down the Development list, requiring Rapid Field Dressing level 2 and Focused Training level 2 (both research lines go up to level 5, but only level 2 is needed here), plus Tech Center level 13. The research itself costs 369,600 Iron, 1,100,000 Coins, and 396,600 Food.
Waterfall Training
A common efficiency technique once you have multiple troop tiers unlocked: instead of upgrading every Barracks to your highest tier, keep them staggered (for example, one Barracks at T10, one at T9, one at T8, one at T7). Lower-tier training completes faster per unit, so you train quickly in the lower Barracks, then promote those troops upward in waves — producing more total troops over time than training directly at your highest tier in every Barracks.
The core idea: spend the week training troops one tier below what your weakest Barracks can build, then on Total Mobilization Day, upgrade that lowest set up one level and move it along to the next Barracks — repeating the "waterfall" each week. Upgrading an existing unit scores the same points as training a new one but takes only 2-4 hours instead of the 12-24 hours a full new batch takes, so this produces far more training points over time than training each Barracks flat-out at its own tier.
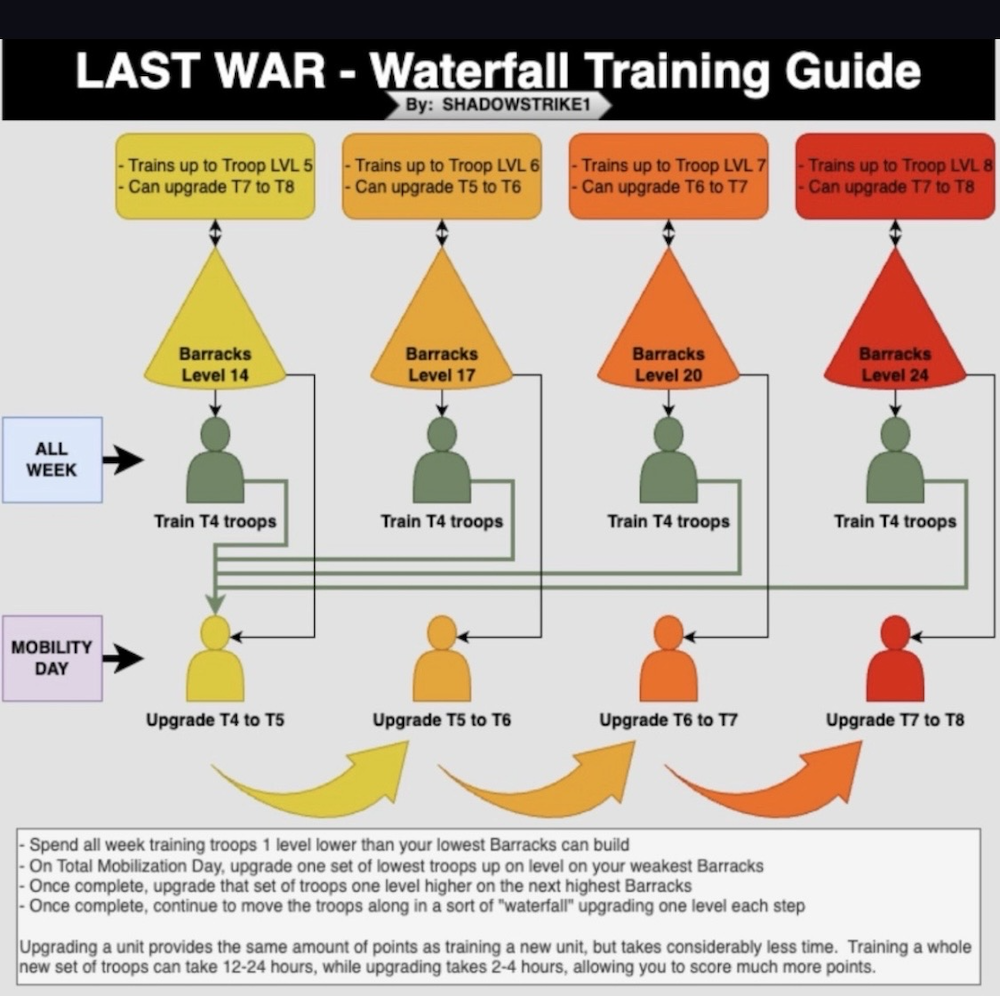
Diagram credit: Shadowstrike1.
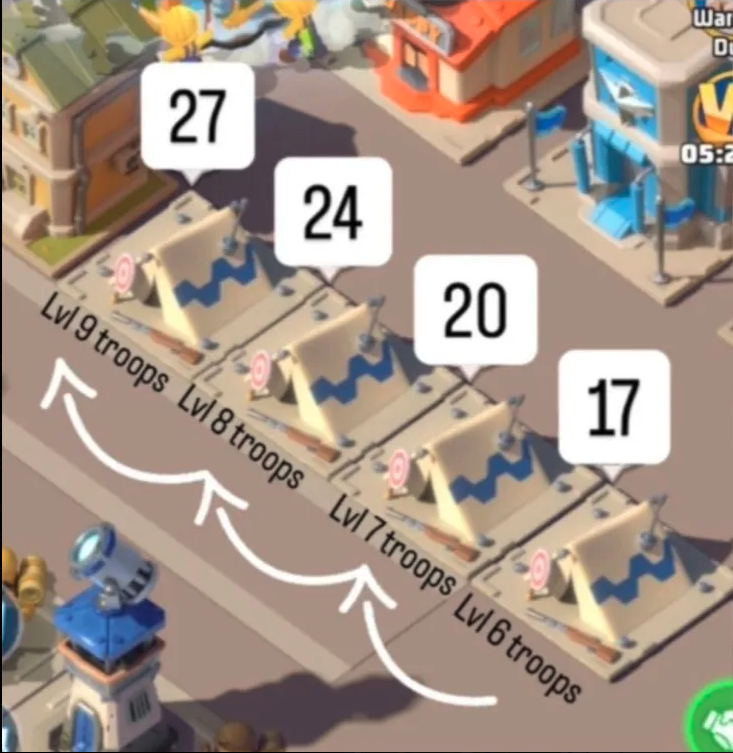
A real in-game example of the staggered setup: Barracks at levels 27/24/20/17 training Lv.9/8/7/6 troops.
March Size & Load Capacity
March Size determines how many troops you can send on a single march, and it's mainly increased through hero leveling and specific survivors (Shirley, unlocked at VIP 8, is commonly cited as one of the biggest single levers for march size). Load Capacity determines how many resources your troops carry back per march, and increases mainly through troop tier upgrades, with additional boosts from Development/Economy research and certain hero gear.